Pages

Subscribe:

Ads 468x60px

ADS HERE

Featured Posts

Kamis, 28 Juli 2011

Pengertian Sistem Operasi


Operating system (OS) atau yang sering di sebut sistem operasi adalah sekumpulan perintah dasar yang berperan untuk menjalankan dan mengoperasikan komputer .Sekarang ini banyak sekali macam-macam sistem operasi di pasaran baik yang asli ataupun yang bajakan.Ada beberapa sistem operasi yang biasa kita jumpai di pasaran diantranya Windows,Unix,Linux Dan masih banyak lagi yang lainya.Dari sekian banyak sistem operasi Yang beredar,sistem operasi milik perusahaan microsoft lah yang paling populer untuk para pengguna pc notebook,bahkan ponsel dan PDA sekalipun Dengan sistem operasi berbasis mobilenya .
Dari beberapa sistem operasi tersebut,Sistem operasi yang dapat digunakan secara bebas alias open sourc Asalah linux. sistem operasi ini biasa digunakan untuk tujuan pendidikan ,lain halnya dengan para vendor ponsel dan PDA ,Para vrndor ini lebih menyasarkan produknya untuk menggunakan sistem operasi mobile milik perusahaan microsoft yaitu windows. Sama seperti di pc atau notebook sistem operasi di PDA atau ponsel memiliki Beberapa versi dan tatap muka yang hampir sama ,mulai dari windows mobile versi 5.0 sampai dengan windows vista versi mobile .Vendor PDA atau ponsel yang biasa memakai sistem operasi tersebut diantaranya 02,Samsung.Doppod Dan sony ericson untuk beberapa type.
Perkembangan Sistem Operasi
Perkembangan sistem operasi Berawal dari altair,yaitu perangkat komputer pertama pada tahun 1975 yang menggunakan sistem operasi CP/M dan kemudian oleh perusahaan microsoft dirilis menjadi MS-DOS Dan berkembang dari MS-DOS versi 1.0 Pada tahun 1981 sampai MS-DOS versi 5.0 pada tahun 1991 dan sampai sekarang ini microsoft telah mengeluarkan beberapa sistem operasi mulai dari Ms-windows,windows97,windows98,windows98Me,Windows2000.Windows ME,Windows XP dan yang paling terbaru adalah windows vista yang terkenal dengan tatatp mukanya .

MACAM -MACAM JARINGAN


Jenis Jaringan Komputer

Sebelumnya saya sudah membahas apa itu jaringan, sekarang saya akan membahas jenis-jenis jaringan komputer seperti PAN (Personal Area Network), LAN (Local Area Network), MAN (Metropolitan Area Network), dan WAN (World Area Network). WAN hampir sama seperti internet, yg memiliki cakupan yang sangat luas. berikut adalah defenisi dari jenis-jenis jaringan :
1. PAN (Personal Area Network)
adalah jaringan komputer digunakan untuk komunikasi antara perangkat komputer,Jangkauan dari PAN biasanya hanya beberapa meter. PAN dapat digunakan untuk komunikasi antara perangkat pribadi sendiri (komunikasi intrapersonal), seperti pada PC dengan keyboard ataupun mouse.
2. LAN (Local Area Network)
adalah jaringan komputer yang jaringannya hanya mencakup wilayah kecil; seperti jaringan komputer kampus, gedung, kantor, dalam rumah, sekolah atau yang lebih kecil. Saat ini, kebanyakan LAN berbasis pada teknologi IEEE 802.3 Ethernet menggunakan perangkat switch, yang mempunyai kecepatan transfer data 10, 100, atau 1000 Mbit/s. Selain teknologi Ethernet, saat ini teknologi 802.11b (atau biasa disebut Wi-fi) juga sering digunakan untuk membentuk LAN. Tempat-tempat yang menyediakan koneksi LAN dengan teknologi Wi-fi biasa disebut hotspot.
3. MAN (Metropolitan Area Network)
adalah jaringan komputer besar yang biasanya mencakup sebuah kota atau sebuah kampus besar. Sebuah MAN biasanya interkoneksi sejumlah jaringan area lokal (LAN) menggunakan teknologi backbone berkapasitas tinggi, seperti link fiber optik, dan menyediakan layanan up-link ke jaringan area luas dan Internet.
4.WAN (World Area Network)
merupakan jaringan komputer yang mencakup area yang besar sebagai contoh yaitu jaringan komputer antar wilayah, kota atau bahkan negara, atau dapat didefinisikan juga sebagai jaringan komputer yang membutuhkan router dan saluran komunikasi publik. WAN digunakan untuk menghubungkan jaringan lokal yang satu dengan jaringan lokal yang lain, sehingga pengguna atau komputer di lokasi yang satu dapat berkomunikasi dengan pengguna dan komputer di lokasi yang lain.

Membuat Directori dan File Dalam CMD


Pada postingan berkut ini saya akan membahas bagaimana membuat direktori dan file dgn menggunakan Command Prompt. sebelum itu pengertian dari CMD ataupun Command Prompt itu adalah menjalankan perintah-perintah atau mengeksekusi file dengan cara menuliskan perintahnya diikuti dengan menekan tombol Enter. yg merupakan standar operasi dari MS-DOS sebelum era Windows.Windows Command Prompt atau biasa disebut DOS Prompt Bisa dijalankan dgn menekan tombol windows+R ataupun dapat melalu start menu dgn memilih menu run dan mengetikan CMD.
1.Macam-macam perintah dasar dalam CMD
Dan berikut adalah macam-macam perintah dasar pada CMD:
*Dir
biasa digunakan untuk melihat directori-directori yg terdapat dalam Disk
*CD(Change Directori)
biasa digunakan untuk berpindah direktori contohnya adalah C:\> Cd D:
*MD(Make Directori)
digunakan untuk membuat directori contohnya D:\tugas mandiri\dean>”tugas SOD”. Mungkin akan timbul pertanyaan kenapa harus diberi tanda kutip. dan jawabannya agar directori yg kita buat itu tidak terbagi menjadi Tugas dan SOD dan maka itu kita memberikan tanda kutip agar directori yg kita buat menjadi satu nama.
*Copy, Dan Xcopy
Fungsinya digunakan untuk mengcopy suatu file atau beberapa file dalam suatu direktori. dan perbedaan nya dgn Xcopy yaitu Mengcopy suatu directori dgn isi file yg terdapat dalam directori tersebut.
*RD(Remove Directori)
Digunakan untuk menghapus directori
*Copy con
Dari judulnya anda mungkin berpikir fungsi perintah ini adalah Mengcopy file/directori tetapi fungsi sebenarnya adalah membuat file. dan kekurangan dari menu ini adalah kita tidak dapat merubah isi file. dan yg lebih mudah dan cepat kita dapat menggunakan menu Edit.
2.Membuat Directori dimenu CMD
clip_image001
Membuat directori tugas mandiri
clip_image002
Berpindah dari directori E: ke Tugas mandiri dan Membuat directori Dean
clip_image003
Masuk ke directori dean dan membuat directori sod, web, pc, kkpi, mtk
clip_image004
Membuat directori gui dan text
clip_image005
Masuk kedirectori GUI dan membuat dan membuat windows, linux, dan mecintos
clip_image006
Masuk kedirectori text dan membuat linux dan dos
clip_image007
Membuat directori rill ganjil dan genap di directori mtk
clip_image008
Membuat directori tiga di directori tiga
clip_image009
Membuat directori portal di web
clip_image010
Melihat semua directori yg telah dibuat dgn menu tree

Database Website


1.Pengertian Database
Data Base (basis data) merupakan kumpulan data yang saling berhubungan. Hubungan antar data dapat ditunjukan dengan adanya field/kolom kunci dari tiap file/tabel yang ada. Dan dapat diandaikan Data Base itu seperti Harddisk dalam computer.
Dalam satu file atau table terdapat record-record yang sejenis, sama besar, sama bentuk, yang merupakan satu kumpulan entitas yang seragam. Satu record (umumnya digambarkan sebagai baris data) terdiri dari field yang saling berhubungan menunjukan bahwa field tersebut dalam satu pengertian yang lengkap dan disimpan dalam satu record.
Adapun Struktur Database adalah:Database
A. File/Table
B. Record
C. Elemen data/FieldDari pengertian diatas dapat disimpulkan bahwa basis data mempunyai beberapa kriteria penting, yaitu :
1. Bersifat data oriented dan bukan program oriented.
2. Dapat digunakan oleh beberapa program aplikasi tanpa perlu mengubah basis datanya.
3. Dapat dikembangkan dengan mudah, baik volume maupun strukturnya.
4. Dapat memenuhi kebutuhan sistem-sistem baru secara mudah
5. Dapat digunakan dengan cara-cara yang berbeda.
Prinsip utama Data Base adalah pengaturan data dengan tujuan utama fleksibelitas dan kecepatan pada saat pengambilan data kembali. Adapun ciri-ciri basis data diantaranya adalah sebagai berikut :
1. Efisiensi meliputi kecepatan, ukuran, dan ketepatan
2. Data dalam jumlah besar.
3. Berbagi Pakai (dipakai bersama sama/Sharebility).
4. Mengurangi bahkan menghilangkan terjadinya duplikasi dan ketidakkonsistenan data.
2.Unsur Utama Database
Sebuah sistem database terdiri dari 4 (empat) komponen utama, yaitu :
a. Perangkat Keras (Hardware)
Merupakan perangkat keras yang dibutuhkan dalam pengelolaan database,
berupa komputer beserta seluruh kelengkapan yang dibutuhkan, seperti
prosesor, memori, harddisk sebagai media penyimpanan datanya, dan lain
sebagainya.
b. Data
Merupakan komponen yang akan diolah sehingga bernilai informasi dan dapat
dijadikan sebagai bahan pengambilan keputusan.
c. Perangkat Lunak (Software)
Perangkat lunak, dalam hal ini DBMS, berfungsi sebagai aplikasi untuk
mengelola database.
d. Pengguna (User)
Ada beberapa jenis/tipe pengguna terhadap suatu sistem database, yaitu :
1. Database Manager
Adalah satu modul program yang menyediakan antar muka (interface)
antara penyimpanan data tingkat rendah dalam database dengan program
aplikasi dan query yang diajukan ke sistem database.
2. Database Administrator (DBA)
Adalah orang yang mempunyai kekuasaan sebagai pusat pengontrol
terhadap seluruh sistem ,baik data maupun program yang mengakses
data.
Fungsi seorang database administrator adalah :
Mendefinisikan pola struktur database
Mendefiniskan struktur penyimpanan dan metode akses
Mampu memodifikasi pola dan organisasi fisik.
Memberikan kekuasaan pada user untuk mengakses data.
Menspesifikasikan keharusan/paksaan integritas data.
3. Database User
Pemakai database berdasarkan cara mereka berinteraksi terhadap sistem
di bagi atas :
a. Programer Aplikasi (PA)
Adalah seorang profesional komputer yang berinteraksi terhadap
sistem database dengan menulis program dan menggunakan Data
Manipulation Language (DML) yang dibuat dengan bahasa
pemrograman, seperti bahasa C, Pascal, Cobol, dan lain-lain.
Program-program yang dibuatnya disebut dengan program aplikasi.
b. User Mahir (Casual User)
Adalah pemakai yang berinteraksi dengan sistem database
menggunakan fasilitas query yang telah disediakan oleh DBMS dan
telah mahir menggunakannya.
c. User Umum (Naive User)
Adalah pemakai yang tidak berpengalaman, berinteraksi dengan
sistem database tanpa menulis program dan query, tapi hanya
menjalankan program-program aplikasi yang telah dibuat oleh
programer aplikasi.

Create a CNAME record


A CNAME record is a type of resource record in the Domain Name System (DNS) that's stored by your domain host. With Google Apps, you'll need to create a CNAME record if you want to customize a service URL for one of your Google Apps services—for example, to access your Gmail sign-in page with the URL mail.your_domain.com instead of mail.google.com/a/your_domain.com.
Specific instructions for popular domain hosts
You create a CNAME record with your domain host. The exact steps for doing so are slightly different for each host. Here are specific instructions for several popular hosts. If your host isn't listed, follow the general instructions, below.
General instructions
Check the status of your CNAME record
After creating a CNAME record and waiting for it to propogate, use the DNS lookup box below to see if your record has been created. (Remember that it can take up to 24 hours for the new record to propogate, so just keep repeating this check until you see the record.)
  1. Enter your CNAME record's prefix and domain name in the CNAME Record Lookup box below. Then click the Lookup button. Here's what to enter:

    your_URL_prefix.your_domain_name
    Example: mail.solarmora.com

    By DNSstuff.com

    CNAME Record Lookup


    Enter prefix and domain name
    Type your CNAME prefix and domain in this box!

  2. Verify the results, which appear in a new window powered by DNSstuff.com. Using the examples given above, your CNAME records should look like this:

    mail.solarmora.com. | CNAME |IN | 3600 | ghs.google.com.

    If you don't get any results, try again later as the record might not have propogated yet.

    Important: Your custom URL prefix must point to ghs.google.com. If your CNAME records aren't pointing to the appropriate Google destination, return to your domain host and modify the CNAME records.

Reset the administrator password


If you can't access the Google Apps administrator control panel because you have forgotten the password for the administrator account, you can reset the password using an automated system. Google sends reset instructions to the secondary administrator email address registered in the Google Apps control panel.
If you don't have access to the secondary administrator email address, you can verify your domain ownership and have the reset instructions sent to another email address that you specify. It can take up to 48 hours to complete the password reset using the domain verification method.
The automated method for resetting the administrator password is not available for Google Apps accounts with more than 500 user accounts. Contact another administrator and have that person reset your password using the Google Apps administrator control panel, or contact Google Support to reset the administrator password.
To reset the administrator password:
  1. Go to the sign in page for the Google Apps administrator control panel.

    The URL is https://www.google.com/a/cpanel/primary-domain-name, where primary-domain-name is the domain name you used to sign up for Google Apps.

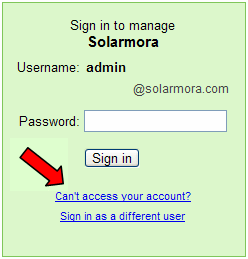
  2. Click Can't access your account?

    The link appears below the Sign in button.

    can't access

  3. Click Reset your administrator password.

    If your Google Apps account allows automated password reset, a page appears with a CAPTCHA word verification test.
    *

  4. Enter the letters from the CAPTCHA into the text field, then click Submit.

    When you correctly solve the CAPTCHA, Google sends a message to the secondary email address associated with your Google Apps account. The confirmation page shows the domain name of the secondary email address to help you identify it.

  5. If you have access to the secondary email address, sign in to that account, open the message with the subject line Google Password Assistance, and follow the link that appears in the message.

    The link takes you to a page where you can select which administrator account to reset the password for and enter the new password.

    If you don't find the message in the Inbox, check the Spam and Trash folders to ensure that your provider hasn't filtered the message. If you can't find the message, continue with the steps below to reset the password using the domain verification method.
If you don't have access to the secondary email address, or can't find the reset instructions that Google sent to that address, you can verify that you own your domain and have Google send the instructions to a different email address.
The domain verification option is not available if you purchased your domain registration from Google during the sign-up process.
  1. After following the steps above, click Reset your administrator password by domain verification on the confirmation page that appeared after you submitted the CAPTCHA.

    By completing the following steps, you verify that you are in fact an administrator for your account by demonstrating that you can update domain records, as you did during the domain verification when you signed up for Google Apps.

    admin password assistance

  2. Enter the email address to which you want Google to send the password reset instructions.

  3. Click Continue with domain verification.

    admin password assistance

  4. Complete the steps described on the page that appears to create a CNAME record.

    For details, including specific instructions for popular domain providers, see Create a CNAME record.

  5. Click I've completed the steps above, continue.

    Please allow up to 48 hours for Google to verify the CNAME changes and send the password reset instructions to the email address you entered at step 2.

  6. Sign in to the specified email account, open the message with the subject line Google Password Assistance, and follow the link that appears in the message.

    The link takes you to a page where you can select which administrator account to reset the password for and enter the new password.

    If you don't find the message in the Inbox, check the Spam and Trash folders to ensure that your provider hasn't filtered the message. If you can't find the message, contact Google Support for assistance.

*The automated reset option isn't enabled for all accounts. If the automated reset option is disabled for your account, you see a Help Center article rather than the CAPTCHA screen. You need to contact Google Support to reset the administrator password. (Return to the steps)

Configuring Your MX Records: DNS Park


  1. Log in to your account at https://www.dnspark.net.
  2. On the left side, click DNS Hosting.
  3. Click the domain you'd like to use with Google Apps for Your Domain.
  4. Since DNS Park is your hosting service, and not your domain registrar, be sure that your domain points to DNS Park's nameservers. This will allow your MX record configuration to take effect.
  5. Click Mail Records (MX).
  6. For MX Resource records, enter the following:
Mail Domain Priority Hostname
(auto-filled) 1st ASPMX.L.GOOGLE.COM.
  1. Click Update.
  2. Repeat steps six and seven for the following MX record entries:
Mail Domain Priority Hostname
(auto-filled) 2nd ALT1.ASPMX.L.GOOGLE.COM.
(auto-filled) 3rd ALT2.ASPMX.L.GOOGLE.COM.
(auto-filled) 4th ASPMX2.GOOGLEMAIL.COM.
(auto-filled) 5th ASPMX3.GOOGLEMAIL.COM.
Congratulations! Your MX records are now configured to point to Google. Keep in mind that changes to MX records may take up to 48 hours to take effect. You can also check the status of your MX records by doing a lookup for your domain.
If you continue to have difficulty, you can contact your domain host for further assistance. Check out a sample message to learn more about what to tell your host.
You can also further troubleshoot your MX records if you continue to experience difficulty in receiving email at your Apps account.