


Hasil instalasi bisa dilihat pada gambar dibawah ini : The results of the installation can be seen in the image below:

Untuk mengujinya mari kita buat Hello, world sederhana. To test it let us create a Hello, world simple. Pertama kita buat sebuah View bernama hello_view.php yang berisi seperti dibawah ini : First we create a View named hello_view.php which contains as below:
Hello, world…!!! Hello, world ...!
hello.view ini nantinya akan di load oleh Controller hello.php dan ditampilkan ke browser. hello.view will later be loaded by the Controller hello.php and displayed to the browser.
Kemudian kita memiliki sebuah Controller bernama hello.php yang berisi seperti dibawah ini : Then we have a Controller named hello.php which contains as below:
Kemudian kita memiliki sebuah Controller bernama hello.php yang berisi seperti dibawah ini : Then we have a Controller named hello.php which contains as below:
class Hello extends Controller class Hello extends Controller
{ {
function index() function index ()
{ {
$this->load->view('hello_view'); $ This-> load-> view ('hello_view');
} }
} }?> ?>

Perhatikan bahwa penulisan nama file harus menggunakan huruf kecil dan penulisan nama kelas menggunakan huruf kapital. Note that writing the file name must use lower case and writing the class name using capital letters.
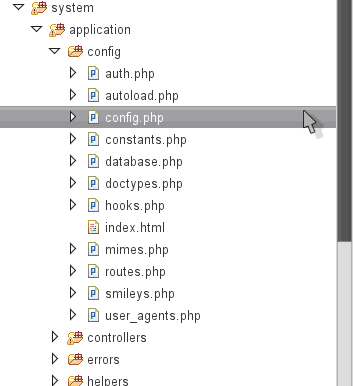
Perhatikan gambar hirarki dibawah ini : Note the hierarchical picture below:
Perhatikan gambar hirarki dibawah ini : Note the hierarchical picture below:

Perhatikan bahwa seluruh file aplikasi CodeIgniter kita berada pada folder system/application . Note that the entire application file CodeIgniter we're on the folder system / application. Seluruh file .php dipecah ke folder masing-masing sesuai dengan jenisnya yang memudahkan dalam proses pembuatan website. Entire file. Php parsed into their respective folders according to its kind that facilitates the process of website creation.
Sebelumnya atur dahulu config.php yang berada di application/config dan ubah base_url seperti dibawah ini : Previously set config.php formerly residing in the application / config and change the base_url as below:
Sebelumnya atur dahulu config.php yang berada di application/config dan ubah base_url seperti dibawah ini : Previously set config.php formerly residing in the application / config and change the base_url as below:
$config['base_url'] = “http://localhost/CodeIgniter”; $ Config ['base_url'] = "http://localhost/CodeIgniter";
Dengan mengubah base_url, berarti kita telah mengatur url default dari situs kita. By changing the base_url, it means that we have set the default url of our site. Dalam contoh diatas, url dari situs kita adalah http://localhost/CodeIgniter/ dan semua kelas yang kita buat dipanggil melaluinya. In the above example, the url of our site is http://localhost/CodeIgniter/ and all the classes that we created was called through.
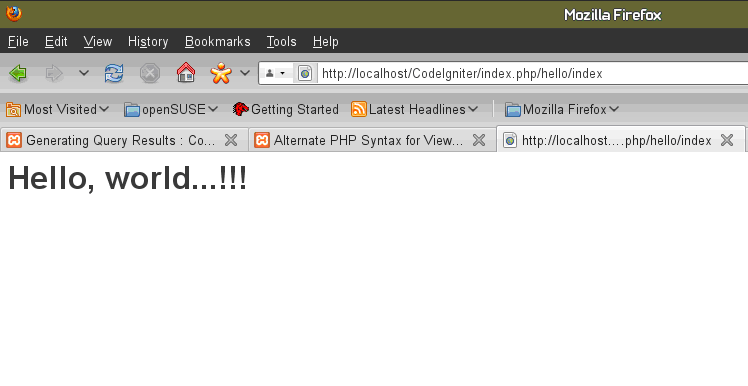
Jangan lupa untuk menyalakan lampp dahulu. Do not forget to turn lampp first. Kembali ke browser dan ketik Return to the browser and type
Jangan lupa untuk menyalakan lampp dahulu. Do not forget to turn lampp first. Kembali ke browser dan ketik Return to the browser and type
http://localhost/CodeIgniter/index.php/hello/index http://localhost/CodeIgniter/index.php/hello/index
isi dari hello_view.php akan tampil seperti di bawah ini : contents of hello_view.php will appear as below:
Tidak ada komentar:
Posting Komentar